Designed in Siemens NX 7.5
As we can't use any of existing parameters as length of beam we have to measure it. To get length of beam that is cut we will use expressions and measurement tool. First go to Tools>Expression... or just use Ctrl+E shortcut. Then you have to make new expression named for example "length_of_beam" ...
... and use "Measure distance" to add value to expression.
And from right click menu select "Style"
One nice technique that can be used to put dimensions of parts of some assembly inside tables in drafting. In my case i had to make cut list of few thousands steel beams used in assembly. It would not be some huge problem if beams in assembly had 90° cut on both sides but... as you can see on picture below it have two surface cuts on both ends and these cuts are on some distance from actual extrude used to make base length of beam. So we can not use extrude parameters as length of beam.
As we can't use any of existing parameters as length of beam we have to measure it. To get length of beam that is cut we will use expressions and measurement tool. First go to Tools>Expression... or just use Ctrl+E shortcut. Then you have to make new expression named for example "length_of_beam" ...
... and use "Measure distance" to add value to expression.
Now to measure length of beam we need to measure it in along beam vector, to do this we will use "projected distance" type of measurement
and for vector that we will use for projection we will select one of edges of beam.
Now you can select any of trimmed faces on one and on another side of beam (why any of two faces? because the maximum distance points are on line of intersection of these two faces, actually on line of intersection of planes that we used to trim off this beam so by selection of any face on one side you will give enough information to finish this operation. This is good only if you use plane to trim off your model, if you use faces, then you have to select these faces that will give you points on maximal distance on both ends of model).
As you know default type of measurement is measurement of minimal distance, but for this case you will need maximum distance to get full length of beam, so we will have to change Measurement type to "Maximum Clearance" ...why don't we use just "Maximum"... I have no clue why in this case if you chose "Maximum" OK button stay inactive, but if you select "Maximum Clearance" you can proceed... maybe it is some of my settings... I do not know...
After this is done, click on OK, and confirm new parameter in expression window.
Now we have to make one more expression that will put this measured value in attributes so we can easily access to it from drawing assembly and use it in tables. Make new expression like this:
this will give us Part Attribute named "Length" with value that is maximal length of this beam.
To use this in drafting table that will give us list of lengths of all beams we have in some assembly (in my case i have 1000+ beams per assembly) we have to go to assembly that we will use for drafting, and to make part list table. In default it will look sometime like this:
Now select "Part Name" column and from right click menu use Insert>Columns to the right
Select new column
And from right click menu select "Style"
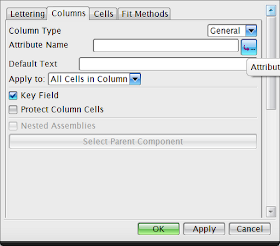
In style window go to "Column" tab:
for "Attribute Name" field click on "Attribute names" button and select "Length" from list:
OK this and you will have:
In this window on other tabs you can customize decimal places, position etc... experiment with all options to get table that have look you want.
Table now have one more column with lengths of all beams in this assembly:
Thank you for reading and I have to give my thanks to www.Eng-Tips.com forum where I found some parts of this solution.


You know the Auto CAD then you should go for Auto CAD inventor Which will suit you best But if you are interested in the others one you van go for CATIA or ANSYS learning ansys will certainly help you . The best destination for learning Ansys is IGTR Aurangabad.
ReplyDeleteSolidworks Training